The Hidden Pitfalls of Stone Facade Cladding in Cold Climates
Cast stone and many types of natural stone are among the most challenging facade finishing materials to use in cold climates.
Surprisingly, none of the major manufacturers and sellers of cast stone address the real difficulties of installing their tiles on the walls of a home, even though they publish plenty of attractive photos of finished houses. You won't find them recommending assemblies or technical solutions for finishing facades. Can you guess why? Our article may be the most complete overview of the problems involved in installing cast stone.
If you read the manufacturers' instructions for installing the stone, you'd think the only sources of trouble are: bad adhesive (read: "not our adhesive"), a weak substrate, and possibly the grout. In practice, it's far more complicated. To make sense of it, you need to understand several things at once.
What happens in cold regions
An important physical process takes place in cold regions. Water vapor from the warm interior is constantly driven outward, including through the walls of the house. This happens because the absolute humidity outdoors at sub-zero temperatures is several times lower than the humidity inside a heated home.
In effect, warm, moist air (a gas) penetrates the walls of the house, and on its way out, at a certain point, it cools enough to condense into actual water (the dew point).
Engineers have to account for this moisture inside the walls, especially when installing stone. In some cases it must be helped to escape; in others it must be kept out.
What a modern private home is built of
In all likelihood, your house is built of autoclaved aerated concrete. It could just as easily be ceramic block, hollow brick, timber, or concrete. These are all vapor-permeable structures that actively move moisture through the walls in winter.
What cast stone is
It is essentially a heavy concrete tile filled with aggregates (sand and crushed stone of various sizes). The tile has low porosity because it is vibration-compacted on a forming table.
The vapor permeability of such stone is very low, as it is with all heavy concretes.
Concrete tile can weigh anywhere from 16 kg/m² (brick look) to 80 kg/m² (rough-stone look) — and every manufacturer carries plenty of the heavier varieties. So, up to 80 kg/m², and that's before adhesive and grout. Natural stone — granite, gneiss, basalt, travertine, and marble — is heavier still, and it has just as much trouble with vapor permeability.
In short, cast stone is a barrier to water vapor.
Safety
Picture an 80 kg/m² stone glued with the best adhesive available onto the gable above an entryway that your loved ones walk through every day. You'd want a safeguard, just in case, wouldn't you? It's possible for the adhesive and stone to get thoroughly wet from the inside and for that water to freeze and expand. It may not happen right away (because the adhesive is good), but after many cycles of freezing while wet and rapid heating in the sun, the stone will eventually peel off.
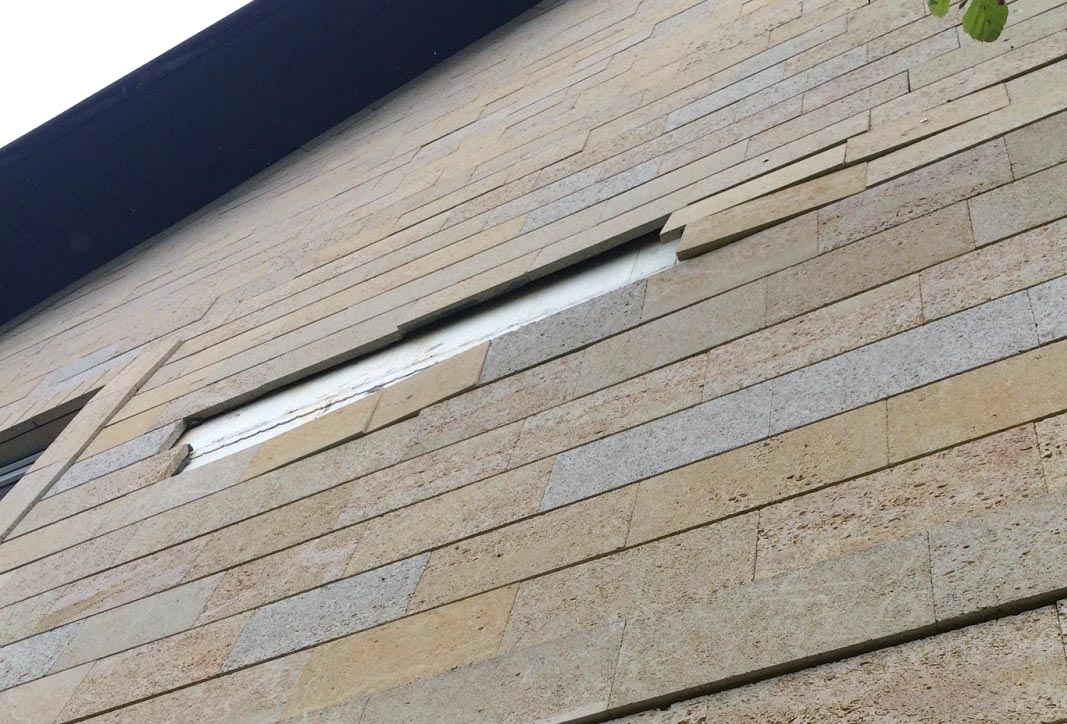
Masonry joints help a little
You can lay stone with or without joints. If there are joints, you can use a grout that lets vapor pass through. The larger each individual stone is in the masonry, the smaller the total area of joints on the wall. Conversely, the smaller the tiles and the wider the joints, the greater the area available for vapor to escape through the grout.
Now let's look at the options for the finishing assembly, because the details matter in every case. In each example, we'll assume the load-bearing wall is made of vapor-permeable materials and the house is located in a cold region. First, let's consider two "bonded" systems, in which all the layers are in tight contact with one another.
Stone applied directly to the wall
Gluing tiles directly to the wall is risky.
The zone of maximum moisture will sit right behind the stone. Part of the load-bearing wall, the adhesive, and the inner surface of the stone will freeze while saturated with water, weakening the structure.
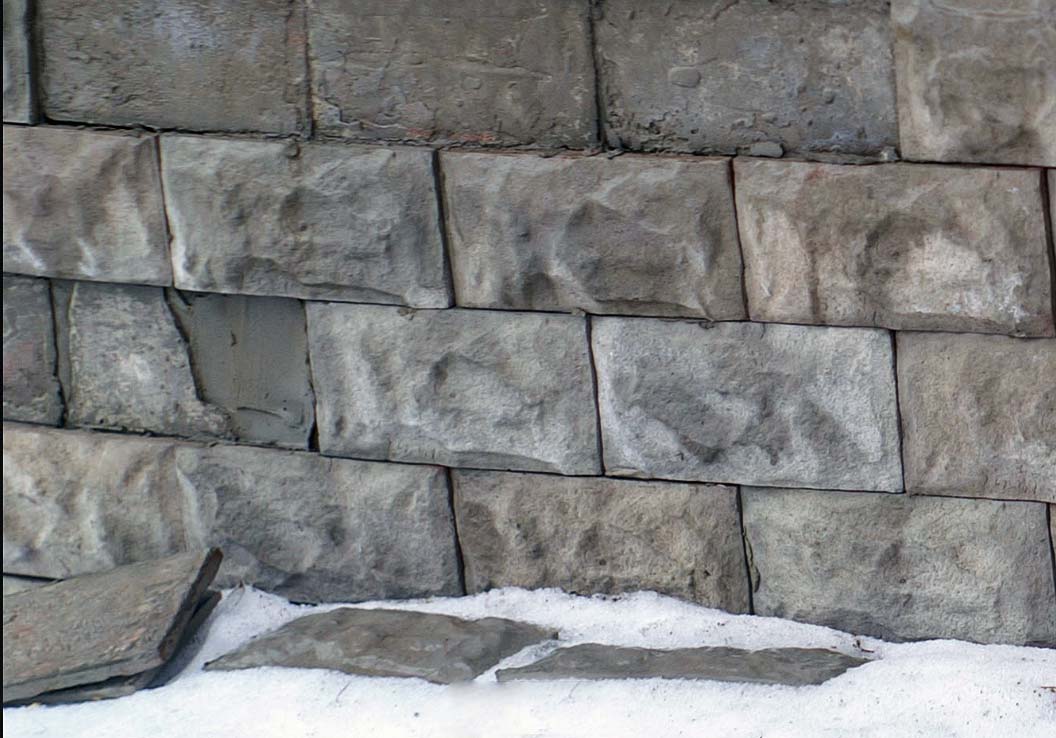
We then have to install an additional metal system to hold the stone on the facade, using a heavy mesh and dowels, with pins driven through the stone to tie it to the mounting system. All of this is embedded in a mortar that starts out fluid, and because of the extra water during curing, the resulting layer is porous, with cavities where ice forms in winter.
There seems to be a simple solution: to keep water from accumulating under the stone on the outside, you prevent it from entering the wall on the inside. To do that, you'd use vinyl wallpaper, vapor-proof paints (the selection is limited), or vapor-proof membranes. But this approach is nearly impossible and expensive, because you'd have to vapor-seal not only the walls but also the ceilings and floors throughout the entire house.
Exterior insulation and finish system (EIFS)
EIFS is now the most popular method for insulating and finishing permanent private homes (in Europe it is known as the External Wall Insulation System, or EWIS, and the External Thermal Insulation Composite System, or ETICS), but it is also a complex system for applying stone. In every case, you have to calculate the protection against over-wetting and ice formation, taking into account the wall material, the home's geographic location, and the area of the joints between the stones, and then select the type and thickness of insulation — all to keep moisture from concentrating in the vulnerable parts of the assembly, such as the wall, the adhesive layers, and the mineral wool.
In most cases, stone cladding requires slowing the release of moisture by using non-absorbent insulation with low vapor permeability, such as EPS or PIR. You can choose the thickness and density (for EPS) so that the dew point falls within the body of the insulation, where it does no harm to the structure. With enough insulation, the load-bearing wall won't condense moisture at all, or only over a small portion of it. The temperature there always stays above freezing, so there is no weakening of the structure.
However, there is a problem with fastening the finish layer to the insulation. The stone is attached to the outer plaster layer on top of the insulation, which is reinforced with steel or composite mesh (not to be confused with plaster mesh). The reinforcing mesh is anchored to the wall through the insulation with galvanized steel screws set in expansion or chemical anchors.
In this case, the effective moisture-resistant thickness of EPS is 100–200 mm. So we need to hold a structure weighing up to 100 kg/m² on a lever arm of roughly 20 cm, with point fasteners set into the loose material of an aerated-concrete or ceramic-block wall, or into a frame wall.
Some stones — especially dark granite slabs — are so heavy and large in area that their thermal expansion and weight alone are too much for any adhesive. As a result, these too are hung on steel hooks, pins, and clamps, after which the reinforcement space between the wall and the slabs is grouted.
There are also methods for selectively supporting glued stones with stainless steel screws that bear the load on their heads.
Such measures are especially important in hazardous walkways above people's heads.
In addition to the static load, there is a pulsating load from wind acting on the "sail" of the outer layer, which is transferred to the anchors in the wall. You have to carefully match the anchors to each wall material in use.
To reduce the leverage of the load when the insulation is thick, it is advisable to use MERK (Sormat) pendulum hooks, which are designed for thick plaster, but installing such a fastening system is more complicated and has its own drawbacks. With pendulum fastening, you also have to account for the insulation's resistance to compression.
The catch is that the technical manuals from the well-known developers of EIFS solutions contain nothing at all for concrete tile on the facade. Ceresit offers a solution for "breathable" ceramic tile up to 25 kg/m².
It turns out that the available solutions for working with stone when insulating a facade by the EIFS method are not backed by official testing from the manufacturers or suppliers of the products; they are the private judgment — and the risk — of individual designers, foremen, and daring builders.
Next, let's consider the "unbonded," or "screen," finishing options, which solve the moisture problem but have weaknesses of their own.
Ventilated facade on cement board
This is a "do-it-yourself" ventilated facade by Knauf, though it isn't detailed there. Cement boards (usually Knauf Aquapanel Outdoor) are mounted on a plane of wooden or metal rails, then a reinforced adhesive layer with a coating is applied to them, and finally they are clad in stone. The solid wall can be insulated with mineral wool, which freely releases moisture, with a ventilation gap behind it. Combustible insulation is not used here because of the high fire risk of the air "channels." The drawbacks of this system are the added weight of the structure and wind loading (wind can rock the wall in both directions and loosen the fasteners). Depending on the substrate, cement boards may eventually crack at the joints, which complicates their use in areas with fine stone finishes (majolica, mosaic). This is very clearly illustrated on stucco facades.
Ventilated facade with tile rails
Systems such as Ronson-House (with wooden uprights) and Ronson-500 (with a metal substructure) require a special stone shape and are therefore limited to a specific set of products. The stones themselves are nearly rectangular. There is no capping, which is not always desirable aesthetically. There is also a limited range of trim pieces, which likewise have to be special-order. At close range, as in private homes, the "noodle" stones laid without joints look good.
Three-layer facades with a ventilation gap and stone finish
This is a reliable system if everything is done correctly.
The outer wall is usually built of face brick, but inexpensive ordinary brick can be used and then faced with manufactured stone or clinker tile. The wall needs vents at the bottom and top so moisture can escape from the inner cavity.
Such a system can be insulated with mineral wool, but the air gap is mandatory.
The finish layer is fully protected from interior moisture, and the wall and insulation stay dry, so the thermal insulation does not lose its performance.
The drawback of the system is that it requires a stronger, reinforced foundation — either a cantilevered monolithic slab or a wide plinth whose outer part must form a horizontal support ledge for building the heavy outer wall (not counting the facing stone).
If the foundation is well designed, you can build a reinforced support ledge on anchors in an already finished house.
An outer wall a half-brick thick or even thinner (European formats) is an unstable structure, especially when built to a height of two or more stories (the gable zone). It must therefore be reinforced and properly tied to the main wall with flexible connectors.
You must also design and install expansion joints, both vertical and horizontal.
Grouting the stone
The grout must be vapor-permeable. The larger the joints — as when laying irregular, multifaceted stone — the more elastic the grout must be. Grout is supplied as a dry mix. A common problem is efflorescence from mineral grout and mineral adhesive; it is simply the result of the moisture transfer through the walls discussed above, or of wash-out when it rains.
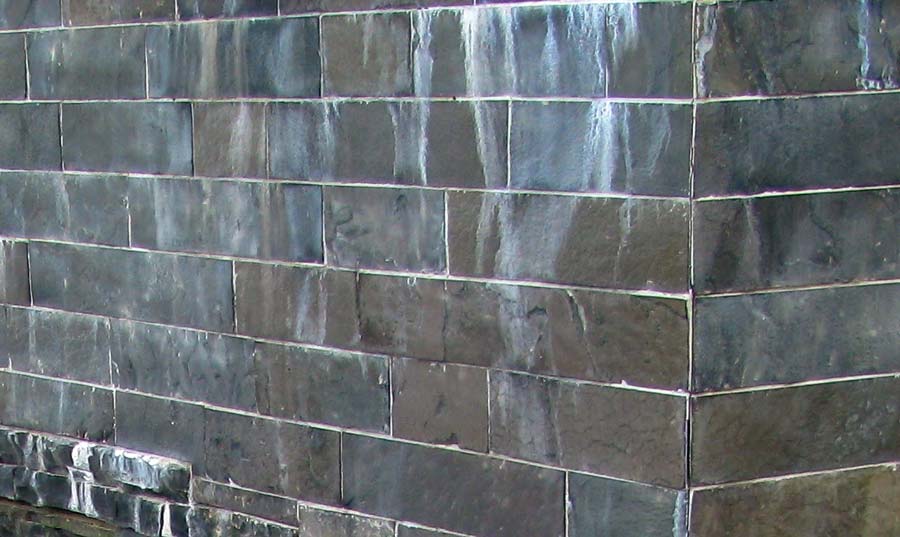
It also occurs at junctions with poorly built flat roofs or sills, when meltwater filters through the wall to the cladding.
Modern, premium adhesives and grouts can handle this problem. On facades, you must use adhesives of class C2 under the European marking and grout of class CG2.
Pauses during installation
Installing manufactured stone requires long curing pauses that the customer may end up paying for. For example, after applying the base coat, the technical instructions call for a 7-day wait so it can build sufficient strength. The joints can be grouted after 14 days. It then takes another 24 days to hydrophobize the stone. This process requires a work plan to be drawn up in advance for the site to avoid downtime.
Interior renovations
A stone finish greatly slows the release of moisture from the wall assembly, so it is better to put off wet finishing work inside the house until summer, when you can ventilate the house freely through open windows. Wet work inside the house in winter can lead to a weakened, stained finish layer: the mineral wool insulation gets wet, and moisture can seep into the inadequately sealed joints of the EPS and the dowel anchor points.
In spring and fall, it is important that the stone already be coated with a water repellent that cuts off the inflow of moisture from outside.
In summer, you also need to dry out any plinth cavities. Open the vents on every side of the house, and make sure they aren't blocked by garden tools, boxes, and the like.
Curved walls
If the house has walls that curve in plan, finishing them with stone is a separate engineering task that depends on the insulation and installation system. One important requirement is that the adhesive layer not exceed the thickness of the finishing material. The smaller the cladding element, the smoother the curve of the finish. A thick adhesive layer at the edges of a long tile shrinks significantly, which causes the stone to pull away or crack.
Additional steps with manufactured stone
Manufactured stone is very rarely pigmented all the way through, so care is needed during installation and in everyday use. When buying stone for cladding, we recommend picking up a couple of extra packs for routine repairs and for replacements in high-traffic areas and on the plinth. It is a good idea to protect the cladding from rain with sufficiently wide roof overhangs, plinth caps, and facade cornices; a quality water repellent, which must be reapplied every 5–7 years, will protect it from driving rain.
Before laying manufactured stone, you need to mechanically remove the "cement laitance" from its back side — the cement foam that appears when the wet concrete mix is vibrated (this cement film should not be confused with a slurry prepared for troweling concrete). Hardened "laitance" on the tile prevents the adhesive from bonding to it. Over time, its reaction with carbon dioxide turns it into limestone.
Cleaning the cement laitance off the tiles is time-consuming, but necessary.
It is best to fill the joints (the expansion gaps) of manufactured stone with a sour-cream-consistency mixture from a caulking gun. This greatly reduces the risk of soiling the face of the stone.
Conclusion
Our customers often remark on how durable stone is compared with decorative plaster, for example. We ourselves use stone constantly in our designs (and oversee its installation during construction supervision).
This review isn't meant to steer customers away from stone, but to give them a general understanding of how complex this beautiful material can be to use. We wanted to show that beneath the layer of reliable stone there is always a supporting structure that has been compromised — a weaker link than the stone itself, especially when there are design and construction errors.